ARTIC Administrator Manual
This document will guide you through all the administrator tools
currently available for ARTIC. If you are new to ARTIC it is
recommended you begin with the Overview section, as this will
provide a checklist and advice on how to go about creating and
managing your teams and queues.
Overview
This section will provide a checklist for setting up a new queue as well as advice on how to begin planning your call flow and team structure.
Things To Consider
When planning a call queue there are 3 important elements:
- The queue where callers will be waiting to speak with an agent.
- The teams that will be handling your calls.
- The agents that belong to your teams.
AVANSER recommends to always start planning your call flow by identifying the teams that will be handling your calls. These teams are the most important element, as it defines the groups of people who will be speaking with your customers and will ultimately determine the experience your customers will have. If you have yet to fully define your teams always remember to consider:
- What are your customers contacting you about?
- What skill sets are required to handle your customer’s needs?
- Which department within your business possesses these skill sets?
Once your teams are defined, the next thing to consider is how your callers will reach these teams. This is where you determine:
- Which queues will the team handle calls for?
- Which queues will the team handle overflow calls for?
- How will the caller arrive in the queue (i.e. does calling a number land directly in the queue or should your caller make a department selection through an IVR Menu?)

For the best caller experience, utilise Time Based Routing to open and close your queues automatically according to your business hours. This keeps agents working to their schedules, and prevents callers from waiting unnecessarily if they call after hours.

AVANSER is a fully managed solution. Your account manager is always available to assist you if you need to discuss anything in more detail.
ARTIC Team Management
This section will walk you through the creation and management of teams. Call handling in ARTIC is allocated by team, and a team is defined as any individual or group of people who follow the same call handling rules (e.g. take calls for the same queues, have the same break types, same ring times).
Creating a Team
In the AVANSER Legacy Portal, select “Manage Teams” from the Q menu:

This will take you to a table showing all your existing ARTIC teams. To create a new team click the green “Create New Team” button in the top right corner of the table:

This will open the team creation form. You will need to complete the following fields:
- Group Name: This is the name that will be used to identify your new team.
- Callback Timeout: This identifies how long a call should ring through to an agent before ARTIC determines the agent will not be answering, and should pass the call to a new agent.
- WrapUp Timeout: This is the amount of post-call evaluation time the agent has before being made available for a new call (i.e. breathing space for follow up work between calls).
- Agent Failure: This defines what should happen if an agent fails to answer a call. The agent can be logged out of the queue, or have their status set back to available. Please note that if the agent is set back to available, due to having failed to answer a call they will not be passed a new call for 1 minute.
- Team Color (Optional): Clicking this field will open a colour pallet allowing you to select a team colour. This will be used to highlight the team column in the Realtime screen to better identify different teams at a glance.

Once the fields have been completed, click save to create your new team. Your team will now be visible in the team table.

Configuring Team Breaks and Pauses
Throughout the day your team may need to take breaks as well as pause themselves from taking calls while they complete detailed work that cannot be interrupted. For each team within ARTIC you can configure up to 10 Breaks and 10 Pauses.
About Breaks and Pauses
There is an important difference between a break and a pause that you should consider before configuring:
- BREAK: A break was designed to cater for agents leaving their desk. When a break times out, it is possible the agent has not managed to return to their desk and is not ready to take calls. Because of this, when a break times out the agent is not made available, instead the agent is placed into a “Late” status. To become available for call taking, the agent will need to manually set themselves as available from the Agent Assistant.
- PAUSE: A pause was designed to allow agents a break from call handling, whilst still remaining at their desk working. When a pause times out the agent will automatically be made available and will resume taking calls.
Configuring a Break Or Pause
To configure breaks and pauses for a team, go to the Manage Teams table and click the blue Globe icon to the right of the team you wish to configure:

This will open the Break and Pause customisation form. This form lists the 10 possible pauses for you to configure, followed by the 10 breaks:

To set a pause or a break:
- In the Custom Label column enter the status name you would like to appear in your Reports and Realtime screen.
- In the Duration column enter how many seconds the break or pause should last before it times out.

Once you have entered all the pauses and breaks you require, click save to complete the configuration. Once saved, any breaks and pauses that have a duration set against them will be immediately available for team members to use.
Assigning Teams To Take Calls
All ARTIC calls are routed through queues, which teams are assigned to in order to handle calls. For more information on managing queue team assignments please see the ARTIC Queue Management section of this document.
ARTIC Agent Management
This section will walk you through the setup of an ARTIC agent and show you how to manage your existing agents. This section assumes you have already set up your call handling teams. If you are not familiar with creating and managing ARTIC teams please refer to the ARTIC Team Management section of this document.
Creating an Agent
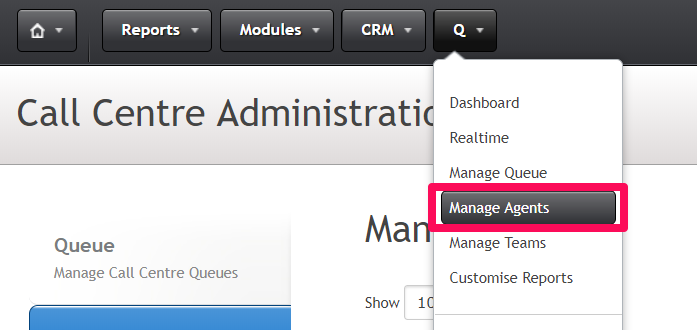
From the Q menu in the AVANSER Legacy Portal, select “Manage Agents”:
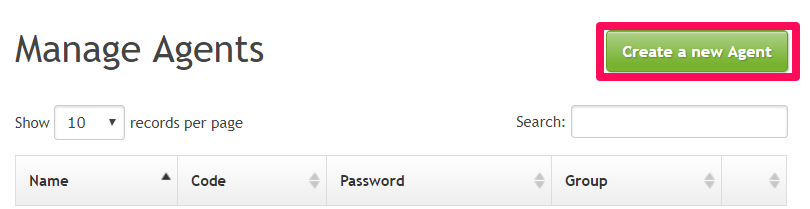
This will take you to a table containing your existing agents. To create a new agent click the green “Create a new Agent” button in the top right corner:
This will open the agent configuration form. You will need to complete the following fields:
- Agent Name: The name of the agent.
- Login Code: A unique ID for the agent. Enter a numeric value.
- Login Password: A login password for the agent. This is for a deprecated feature, but whilst updates are being made to the ARTIC platform this is still a mandatory field for the time being. Until further updates are made, use the same number assigned to the Login Code.
- Max Chats: Deprecated feature schedule for removal. Set to 1 for the time being.
- Team: Select the team this agent belongs to from the drop down menu. You will need to have a team configured prior to creating your agent, so if this list is empty please see the “ARTIC Team Management” document for more information.
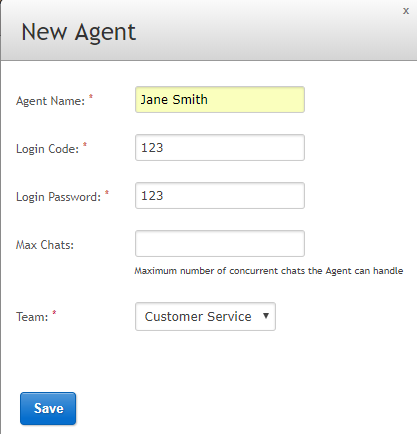
Once all fields are complete, click save to finalise your agent.
The agent will now be visible within the Manage Agents table. To adjust any details of the agent click the blue pencil icon in the right hand column, or to remove an agent click the blue X icon:

Creating a Portal User
Once you have created your new agent, a user will need to be created to allow this agent to log in to the AVANSER Legacy Portal. Please send an email to our Support Team with the following information:
- Subject: New ARTIC User
- Agent Name:
- Agent Email:
- Agent Phone#:
- Access Level:

Please note that there are 3 access levels to select from:
Agent - Allows the agent to see only themselves in the Realtime screen and Dashboard.
Supervisor - Allows the agent to see all agents within their team in the Realtime screen and Dashboard.
Master - Allows the agent to see all agents and teams in the Realtime screen and Dashboard.
ARTIC Queue Management
This section will walk you through the creation and management of ARTIC call queues. This is where callers will be directed to link with an available agent, and is also where you assign the teams that will be handling these calls.
Creating a Queue
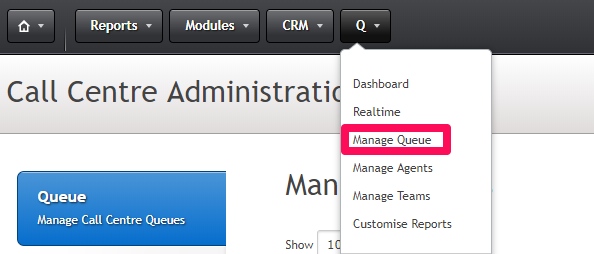
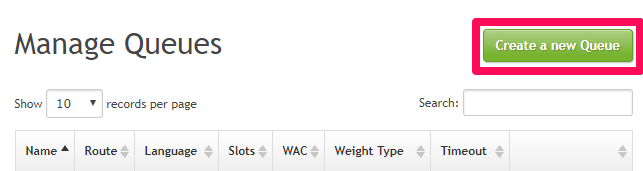
In the Legacy Portal, select “Manage Queue” from the Q menu:
This will take you to a table showing all your available call queues. To create a new queue click the green “Create a new Queue” button located in the top right-hand corner of the table.
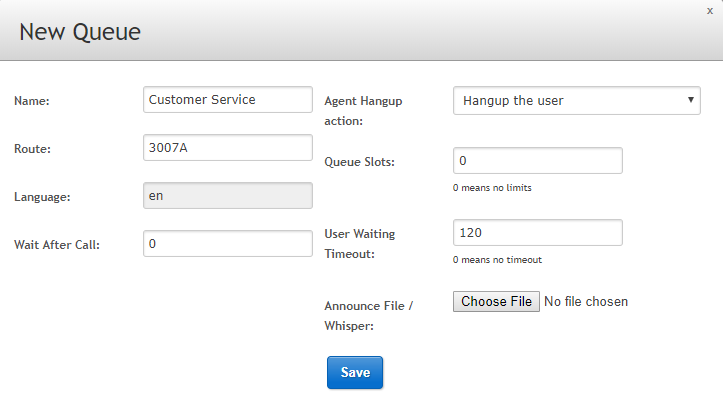
This will open the queue configuration form. You will need to complete the following fields:
- Name: An easily identifiable name to help identify the queue and its purpose.
- Route: A unique reference for the queue, used to add queues to call routing. By default the AVANSER Support team uses your client ID + A, B, C etc… (e.g. 6000A, 6000B…). Future updates will auto generate this reference for you, in the interim it is recommended to use the same standard as AVANSER Support.
- Wait After Call: If required this allows you to enter how many seconds a caller should wait in the queue before being directed to an agent (i.e. a minimum wait time in the queue).
- Agent Hangup Action: Allows you to set the call to end if an agent hangs up, or if the caller should be linked to another agent. By default this is set to end the call upon agent hangup.
- Queue Slots: Allows you to define the maximum number of simultaneous calls that can be handled by the queue. Once the limit is reached, additional callers will be automatically directed to the default routing (usually a voicemail, but this will depend on your call flow). By default this is set to 0 which indicates there is no limit on how many simultaneous calls you can have
- User Waiting Timeout: This field lets you define how many seconds a caller may wait in the queue without being answered before being directed to your default routing (usually a voicemail, but this will depend on your call flow). To ensure a good calling experience AVANSER always recommends placing a limit on how long callers can wait in a queue, but if required you can set this as 0 which will result in callers waiting until either they hang up or are answered.
- Announce File/Whisper (optional): This allows you to upload a sound file that will let agents know what the call is regarding before passing the caller through. There are alternate ways to manage whispers within your call routing; if your whispers vary depending on the tracking number rather than the queue it is recommended to discuss this with the support team to ensure you can get the most out of your call whispers. Uploaded files need to be in a 16Bit 8000Hz .wav file to ensure compatibility with telephony standards.
Once all fields have been completed, click save to finalise creation of your queue. Your new queue will now be available within the Manage Queue table:

To edit the details of an existing queue, locate the desired queue in the table and click the blue pencil:

Assigning Teams to Queues
All call handling within ARTIC is handled by teams. This section of the document assumes you have already created your call handling teams. If you have not done this yet please refer to the ARTIC Team Management section.
Adding The First Team
To begin, locate the queue you wish to assign teams to and click the team link icon:

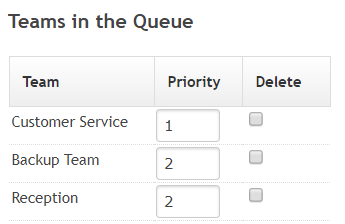
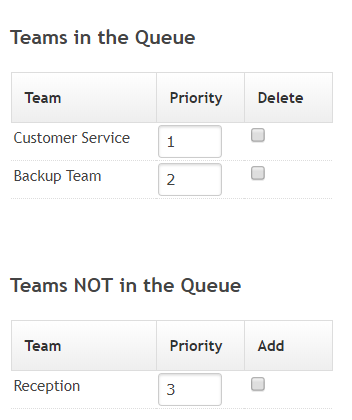
This will open a popup window with 2 lists. The top list shows all teams currently handling calls for the queue, and the bottom list shows all the teams not handling calls for the queue:
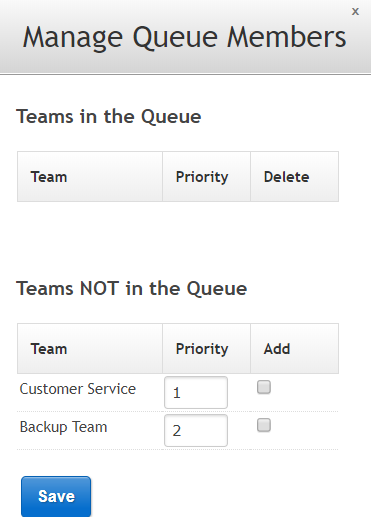
To assign a new call handling team to the queue, find your desired team in the “Teams NOT in the Queue” list. For the first team, make sure the priority is set as 1 (priorities are explained later) then check the “Add” checkbox to the right of the team:

Click save, and your team will move up into the “Teams in the Queue” list:
The team will immediately begin handling calls in this queue once this step is complete.
Adding Additional Teams
ARTIC allows you to assign as many teams as required to handle calls in your queue. When adding a team they can be given varying priorities to ensure calls are handled effectively. Simply enter the priority with which the team will be taking calls, check the “Add” checkbox in the right-hand column, then click save to have this team start taking calls for the queue. Please see below for information and examples on how priorities work.
How Do Priorities Work?
Calls will be passed to whichever team has the highest priority, starting at priority 1, provided that team has agents available. If no agent from a priority 1 team is available, ARTIC will seek an available agent from a priority 2 team, then a priority 3 team and so on. In each instance, the call will be passed to whichever agent from the team has been waiting the longest.
It is possible to use the same priority more than once.
- Example 1 - 2 teams are assigned to priority 1. This will result in calls being passed to whichever agent has been waiting the longest regardless of which team they belong to:

- Example 2 - One team is assigned to priority 1 and two to priority 2. This will result in calls always being delivered to the priority 1 team even if a priority 2 team member has been available longer. However, if no one from the priority 1 team is available the call will immediately be passed onto an available agent from either of the priority 2 teams, selecting whichever agent has been waiting the longest:
Removing Teams
To stop a team from handling calls within a queue, locate your queue in the “Manage Queue” table and click the team link icon:
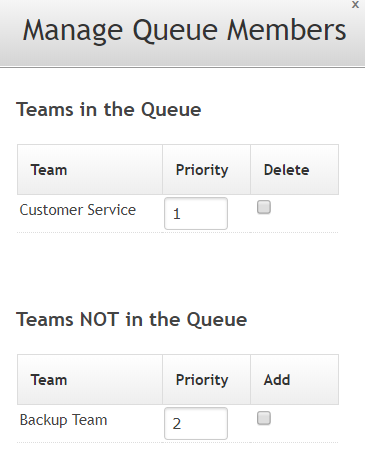
In the team link popup locate the team you wish to remove in the “Teams in the Queue” list, and click the “Delete” checkbox in the right column next to the team you wish to remove:
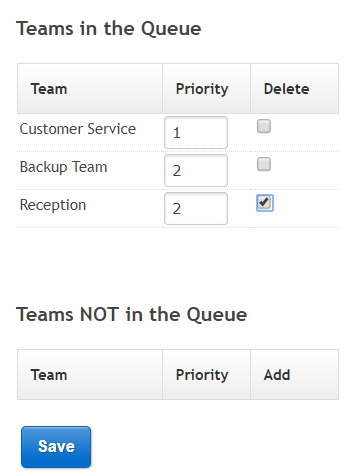
Once you click save the team will appear in the “Teams NOT in the Queue” list. They will immediately cease receiving calls from this queue once this step is complete:
Directing Callers To The Queue
At this stage the provisioning tools within the Legacy Portal do not allow you to assign your new queue to your tracking numbers. To start receiving calls in your queue please contact your Account Manager, or our Support Team.
Outbound Dialler
This section will walk you through enabling the ARTIC Outbound Dialler. Whilst other methods are available for initiating outbound calls through ARTIC (SIP, Portal Dialler), the advantage of the ARTIC outbound dialler is it enables the standard inbound features (call transfer, hold, start/stop recording) for outbound calls as well.
Enabling the Outbound Dialler
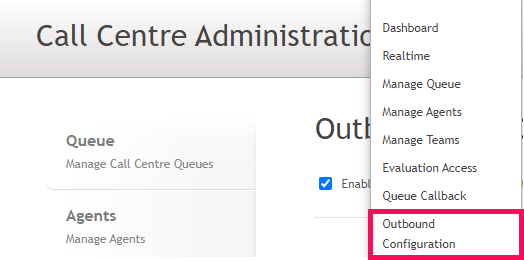
To configure the Outbound Dialler, navigate to the “Outbound Configuration” screen under the Q drop-down menu:
Once on the Outbound Call Configuration screen, tick the “Enable Outbound Call Functionality” checkbox:

The configuration options will then appear on-screen.
There are three levels of settings - Global, Team and Agent. Each sub-level will override the level above for the users to which it is applied. For example, setting call recording to disabled for the Support team will override the enabled call recording at the Global level. There must always be a Global configuration regardless of whether Team or Agent is configured.
The options available to configure are as follows:
- Call Recording: Whether calls made through the Dialler will be recorded.
- Allow Agent to Override: Allows agents to set individually whether their calls will be recorded.
- Hold Music: Hold Music that will be played when the customer is placed on hold during the call.
- Tracking Numbers: The numbers that will be available for agents to choose from when making an outbound call. This is the caller ID that the customer will see when they receive the call.
- Set Default: This sets the default number that will be selected by the Dialler for the call. There must always be one number set as the default.
- Override Hold Music: Allows you to override the default hold music and instead set separate hold music per number. Useful if you have multiple brands or numbers for different purposes.

These same options are also available for the team and agent-level overrides.
Once you have finished configuring the options, click Save to enable the Dialler. Note that after making changes to the Dialler configuration, agents will need to refresh their browser to reflect them.
Queue Callback
This section will walk you through enabling the ARTIC Callback feature for a queue. This section assumes you have already set up your queues. If you are not familiar with creating and managing ARTIC queues please refer to the ARTIC Queue Management section of this document.
ARTIC’s automated callback feature allows you to configure a queue to create a callback entry when a caller times out, rather than passing to a voicemail or other default routing flow. This not only eases the process of returning customer calls, but also creates a better experience for your callers.
Callbacks work by timing the caller out to an automated message, which confirms their phone number and informs them they will be called back as soon as possible. A callback record is then inserted into the queue, similar to an inbound call. ARTIC will then assign this call to an agent as normal. Once the agent answers they will be played a message informing them that this is a callback, after which ARTIC will dial the customer and connect them to the agent.
Configuring a callback for a queue overrides the default timeout behaviour for that queue, but is still controlled by the “User Waiting Timeout” value set in the queue settings. See Creating a Queue for instructions on how to adjust this.
Enabling Callbacks
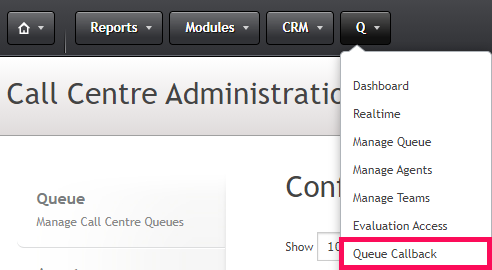
To enable callbacks for a queue, head to the “Queue Callback” screen under the Q drop-down menu:
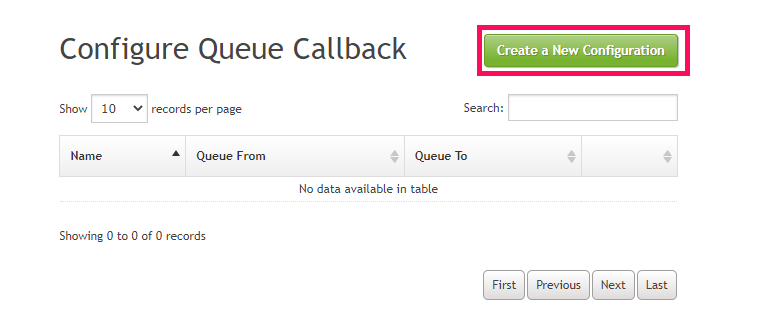
This screen will display any currently configured callbacks. To configure a new callback, click the green “Create a New Configuration” button:
This will open the callback configuration form containing the following fields:
- Name: Name of the callback configuration.
- Caller ID: The number that will be displayed when ARTIC calls the customer.
- Queue From: The queue that will trigger the callback.
- Queue To: The queue that the callback entry will be placed into.
- Record: Whether the callbacks will be recorded. Combined is the standard recording option, however split-channel should be used if agents require the ability to transfer or start/stop call recording.
- Call Status: This allows you to set the rules for what calls will trigger a callback:
- Timed Out: For the default time out from the queue, check the “Timed Out” checkbox.
- Abandoned: For calls that are abandoned (caller hung up before being answered), check the “Abandoned” checkbox. You can then additionally configure minimum and maximum queue wait times for the abandoned call to trigger a callback.

Once this form is completed, click Next.
You will then be met with a screen that lists the audio files used in the callback. From here you can preview the audio and replace the default files with your own custom audio. When you’re ready to proceed, click Save to complete the configuration.

The callback will now be enabled and visible in the list:

If you’d like to disable the callback, click the blue circle button next to the row. It will turn grey to indicate the callback is disabled.

You can also edit and delete the callback using the other respective buttons.
Evaluation Access
This section will walk you through configuring Call Evaluation Access. This section assumes you already have the Call Evaluation feature enabled on your account. If not and you would like to know more, contact your Account Manager.
Evaluation Access allows you to set which ARTIC teams will have access to which Evaluation form tabs. This is useful if you want to restrict sales or support to filling in only their team’s respective Evaluation form.
Adjusting Evaluation Access
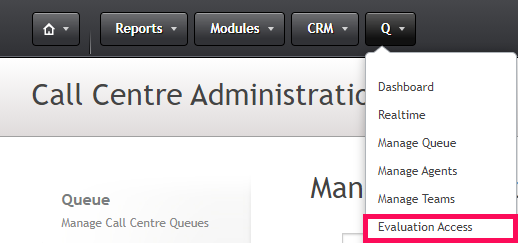
To configure Evaluation Access, navigate to the “Evaluation Access” screen under the Q drop-down menu:
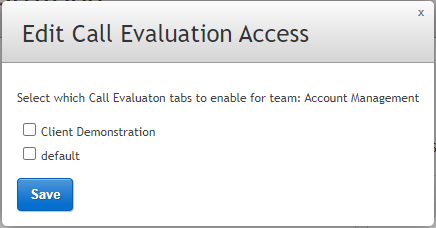
This screen will show a list of your teams, along with any access they currently have to Evaluation form tabs. To edit a team’s access, click the pencil icon next to the right of the row:

A popup will then appear allowing you to edit the access. Tick the checkbox next to the tab(s) you would the team to have access to and then click Save:
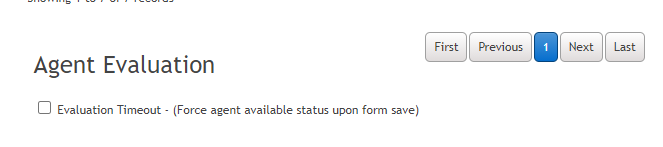
Below the table, under the Agent Evaluation heading, is a checkbox that allows you to set ARTIC to automatically force the agent to available status once they save an Evaluation form, overriding any evaluation time that has been set for that team. This is useful if Call Evaluation forms part of their after call work and you want agents to take calls immediately after finishing the form, rather than riding out the rest of their allotted evaluation time.
Customise Reports
This section will walk you through setting custom ARTIC report labels, allowing you to bring ARTIC in-line with your own business terminology.
Adjusting ARTIC Labels
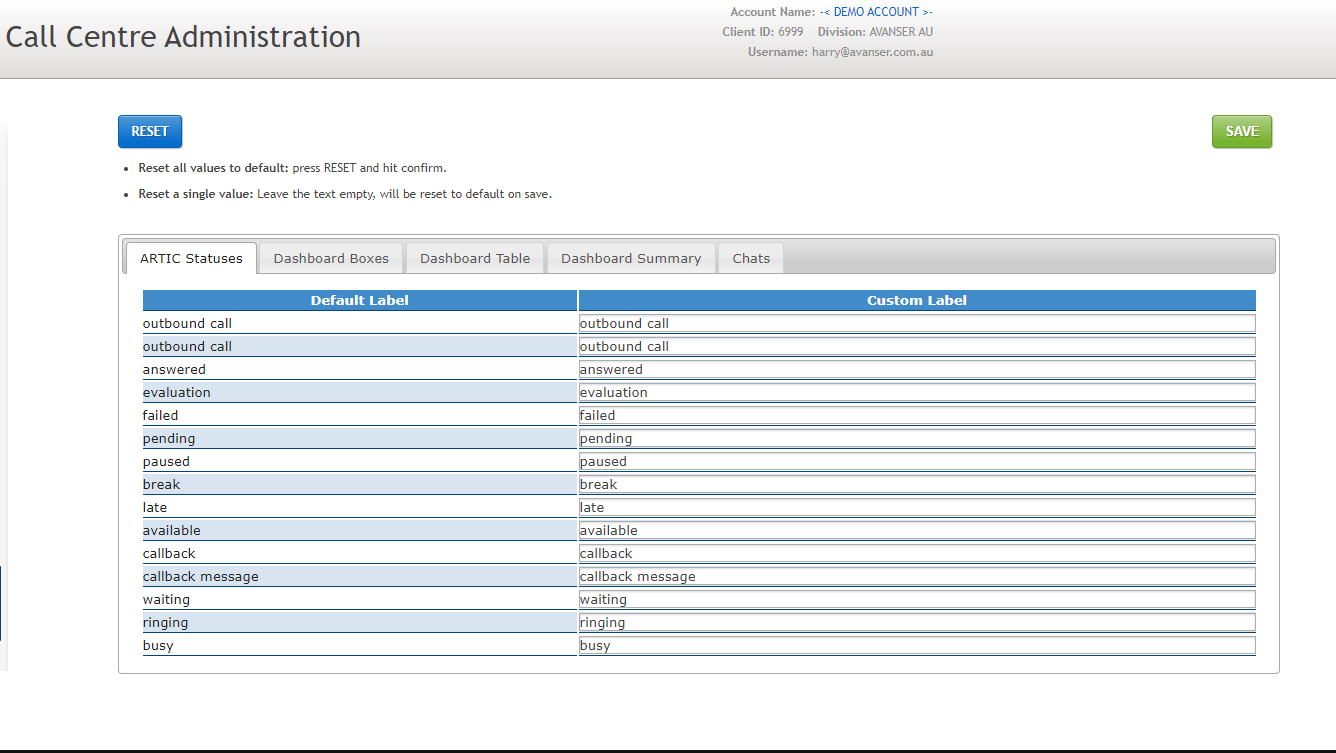
To customise ARTIC’s reporting labels, navigate to the “Customise Reports” screen under the Q drop-down menu:

On this screen is a table showing the default labels, along with any custom ones. You can use the tabs above the table to see the labels for the different ARTIC screens. To set a label, simply replace the value in the right-hand column with desired label text and then click Save. If you want to reset all labels to their default values, use the Reset button on the top-left of the screen:
Related Articles
ARTIC User Manual
This guide will walk you through the basic functions of ARTIC and what you need to know to use it in your day to day operations. Log In to Start Taking Calls Step 1: Log in to the AVANSER Legacy Portal Log into the AVANSER Legacy Portal , enter your ...Call Recording Guidelines
Call recording is an important feature for many businesses and this solution is often bundled with AI-powered analytics, and even agent coaching systems. Not only does call recording provide valuable compliance and regulatory assurance, it also gives ...Call Evaluation Overview
Call evaluation tool allows businesses to rate all calls and give insight into the content of calls. You will have tangible evidence on which key areas need improvement and what your clients are calling about. This tool provides the user with the ...Reports: Call Log - Filters and Data Access
The Call Log is the list of all calls received on your tracking numbers for the selected period. Viewing the data The standard view for the call log provides a list of call details. It can be customised as per requirements (see Personalising Fields ...Call Statuses Explained
You may notice in your call reporting that your phone calls have different statuses. The status indicates what happened to the call when it rang at the end phone. Each status means something different, so see below for a simple explanation: Status ...