ARTIC User Manual
This guide will walk you through the basic functions of ARTIC and what you need to know to use it in your day to day operations.
Log In to Start Taking Calls
Step 1: Log in to the AVANSER Legacy Portal
Log into the AVANSER Legacy Portal , enter your login details, then click login:

If you have forgotten your password, click the “Forgot Password?” link located under the user name field on the right and follow the prompts. An email will be sent to you with a link that will allow you to set a new password.
Step 2: Set your phone number
Before logging into the queue, ensure your phone number is set correctly for the device you will be using for the day. In the top right corner of the portal select “General Info” from the “User Preferences” menu:

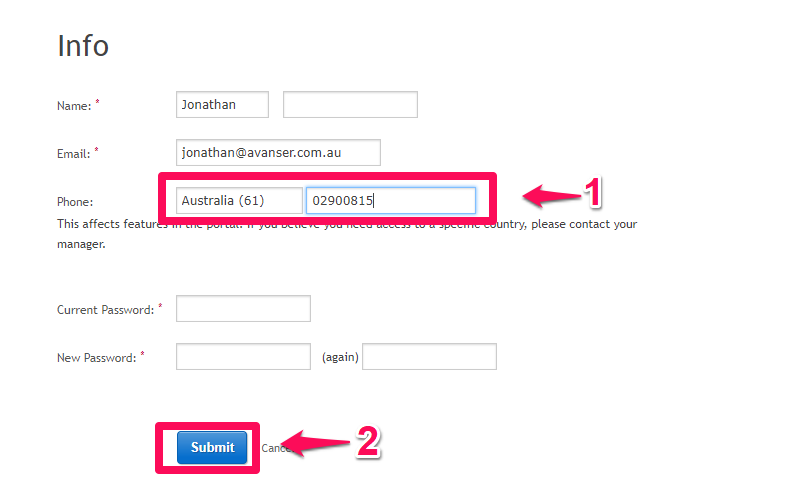
In the General Info page under the “Phone” field, set your phone number by entering the country in the first field and the full phone number, including area code, in the second field. When done click “Submit” to lock in the phone number.
To set an AVANSER extension as your answerpoint, enter “Extension” in the country field, then select the extension you would like to use from the drop-down menu of available extensions:

Step 3: Log in to the queue
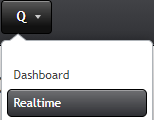
Once your phone number is set you will need to log in to the queue to signal you are ready to start taking calls. Navigate to either the Dashboard or Realtime Screen by selecting from the “Q” menu in the portal:

Once on these screens you will be presented with the Agent Assistant which will follow you as you scroll around the page. To signal you are ready to start taking calls click the green “Login” button:

When successfully logged in the Agent Assistant will show your current status as “Available” and will be coloured green. You will also be visible in the Online Agents table of the Realtime screen:

Screens
There are two main screens in ARTIC which you will be accessing; the Dashboard and Realtime.
Dashboard
The Dashboard is the reporting hub for ARTIC. It contains visual graphs and summaries of various queue stats, as well as team and agent breakdowns. Visibility of the data in this page will be determined by your access level.
To access the dashboard, navigate to the “Q” drop-down menu and select “Dashboard”:


The table at the bottom of the page contains a breakdown of stats by team. To narrow this down by agent, click on the name of the team you wish to view:

The dashboard will then update to show the stats for that team only. The table breakdown at the bottom of the page will also update with the metrics for each agent within the team selected. Clicking on an agent’s name will then refresh the dashboard to reflect that agent’s stats.
Realtime
The Realtime screen provides an accurate overview of the current activity of your queues. It shows currently online agents and their status, offline agents and calls waiting in the queue. Visibility of the data and functions in this page will be determined by your access level.
To access the Realtime screen, navigate to the “Q” drop-down menu and select “Realtime”:

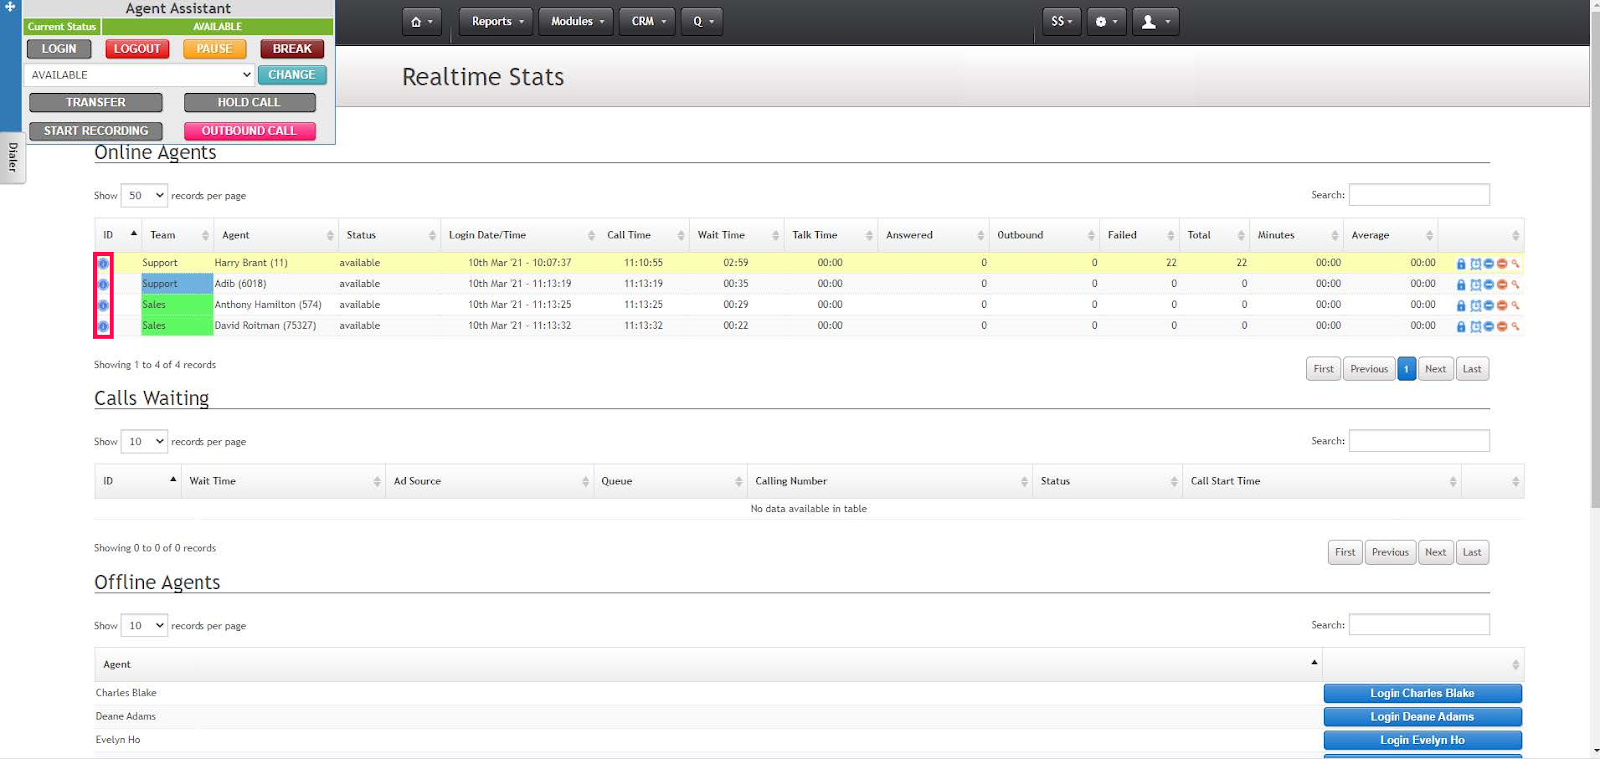
The “Online Agents” table displays a list of the agents who are currently logged in to the queue (online). It contains information on the team, agent name, login date and time, time of the last call they answered, how long they’ve been waiting for a call, how long they’ve been talking on the current call, how many calls they have answered, failed (missed) and dialled outbound, the total number of calls, total minutes and average minutes. Depending on your access, the buttons next to the agent can be used to put them on a default five minute pause or break or forcibly log them out.

The details of the agent, including their current answer point and call history, can be checked by clicking the “i” icon in the “ID” column:
When a call enters the queue, it will appear in the “Calls Waiting” table. From here you can see the queue the call is in, the ad source name of the number called, the caller’s phone number, how long they’ve been waiting and the status (indicates if they’re paused whilst listening to a recorded message or are actively waiting to be answered).
The “Offline Agents” table shows which agents are currently not logged in (offline). Depending on your access you will be able to forcibly log other agents into the queue using the “Login [Agent Name]” button.

Pausing and Breaking
ARTIC allows you to pause from taking calls or go on break at any point, preventing calls from being directed to you. The primary difference between the two is as follows:
- Pause - Automatically reverts back to available once the allotted time has elapsed.
- Break - Tracks your status as “Late” once the allotted time has elapsed.
To set yourself on a Pause or Break click the drop-down menu in the Agent Assistant, select the status you would like to enter, then click the blue “Change” button:

This will update your current status in both the Agent Assistant and Realtime table:

The drop down will then automatically switch the selection back to available. Whenever you would like to return from break or remove the pause status manually, just click the “Change” button again.
Transferring Calls
ARTIC allows calls to be transferred in a number of ways. Both inbound and outbound transfers are available, however with outbound the call must be made using the ARTIC Dialler. Outbound calls executed through an external SIP softphone or device do not support transfers. See Making Outbound Calls.
To transfer a call, click the green “Transfer” button:

A popup will then appear allowing you to select who you’d like to transfer the call to:

The differences between these options are as follows:
- Agent Transfer - Transfer to a currently logged in and available agent in ARTIC.
- Queue Transfer - Transfer to another ARTIC queue.
- External Transfer - Transfer to an external number (not within ARTIC).
With the exception of Queue Transfer, once an option has been selected a drop-down to choose the type of transfer will appear:

The differences between these options are as follows:
- Assisted Transfer - Provides the opportunity to speak to the person you’re transferring to before ARTIC connects them with the customer. More commonly referred to as a “Warm Transfer”.
- Direct Transfer - Connects the customer straight to the person you’re transferring to without providing the opportunity to speak to them first. More commonly referred to as a “Cold Transfer”.
To perform an Assisted Transfer, select the queue, agent or enter the external number you want to transfer to and click “Transfer”. ARTIC will then automatically place the customer on hold and call the person you selected. Whilst dialling you will hear hold music. You can cancel the transfer attempt during this time by clicking the red “Cancel” button. If they answer, you’ll be connected to them and can freely discourse whilst the customer is on hold. When you’re ready to complete the transfer, simply hang up the call from your device; this will automatically connect the customer to the person you transferred to. If you would like to establish a conference call with both parties, you can click the orange “Release Call” button which will take the customer off hold and allow three-way communication. If you don’t wish to complete the transfer, ask the person you’re transferring to to hang up; this will return you to the customer.


Placing the Customer On Hold
To place a caller on hold, click the “Hold Call” button:

Whilst the call is on hold, both you and the customer will hear hold music. When you are ready to resume the call, click the “Release Call” button:

Starting and Stopping Recording
Depending on the recording setting for the queue (inbound) or your agent (outbound), you may be able to start/stop the recording whilst on a call. To do so, click the “Start Recording” / ”Stop Recording” button.


Making Outbound Calls
The process for making outbound calls differs depending on the features required and method used:
SIP Softphone/Handset
When using an AVANSER SIP extension, you will be able to dial out of your IP-capable desk phone/softphone as normal and ARTIC will register your outbound call activity, preventing inbound calls from being directed to you. However, you will not have the ability to transfer or pause/resume call recording. These features are exclusive to the ARTIC Dialler which is explained below.
ARTIC Dialler
The ARTIC Dialler is a full outbound dialling system within the Agent Assistant. It can be used with both a regular answer point number (landline/mobile) or an AVANSER SIP extension. The answer point will be automatically set as per what’s configured in your user settings. The ARTIC Dialler must be enabled for your account by a user with Supervisor permissions before it can be used.
To access the dialler click the “Outbound Call” button within the Agent Assistant:

This will open the dial pad. Type in the destination country and phone number (including area code) of the person you would like to call. When ready, click the green “Call” button. Depending on your queue configuration, you may also be able to choose the tracking number you would like displayed as your caller ID and whether the call will be recorded:
Once initiated you will receive a call on your phone first. Upon answering, the number you entered will be dialled and you will be connected through to that party. Whilst on the call, ARTIC will display your status as “Outbound Call”.
Ending Your Day
Once you have finished for the day, it is important to remember to log out of the queue. In the Agent Assistant, click the red “Logout” button to remove yourself from the queue:

Related Articles
ARTIC Administrator Manual
This document will guide you through all the administrator tools currently available for ARTIC. If you are new to ARTIC it is recommended you begin with the Overview section, as this will provide a checklist and advice on how to go about creating and ...Call Evaluation Overview
Call evaluation tool allows businesses to rate all calls and give insight into the content of calls. You will have tangible evidence on which key areas need improvement and what your clients are calling about. This tool provides the user with the ...User Preferences
User Preferences module allows you to modify basic setting and personalization of your account. Access This module can be access when clicked on the 1. button located on the right upper corner of the page. Then you need to select 2. User Preferences ...Call Recording Guidelines
Call recording is an important feature for many businesses and this solution is often bundled with AI-powered analytics, and even agent coaching systems. Not only does call recording provide valuable compliance and regulatory assurance, it also gives ...Reports: Call Log - Filters and Data Access
The Call Log is the list of all calls received on your tracking numbers for the selected period. Viewing the data The standard view for the call log provides a list of call details. It can be customised as per requirements (see Personalising Fields ...