Access to this tool has been limited to authorized users only. If you required certain users to have access to this module, please contact your Account Manager.
The dynamic numbers configuration section allows user to add new tracking codes to their service or modify existing tracking codes directly within the Customer Portal using the self service tools.
This guide will show you the configuration of dynamic Numbers, using different campaigns running on the same website and can be used as a reference for adjusting your existing configurations.
Before jumping to the article check out our short videos:
Basic Dynamic Numbers Configuration
Advanced Dynamic Numbers Configuration
This article covers the use of the Automated Number Replacement method, but the Advanced HTML Replacement method can be used as well. Automated Number Replacement is easier to implement and the tracking service is easier to maintain.
The options are the following:
Show one number for one combination of medium/source/campaign (example: one number that swaps for paid advertisement, one for organic searches, etc.)
Show one number for multiple combinations of medium/source/campaign (example: the same number will swap for paid advertisement and for organic searches, etc.)
Show different numbers for the same combination of medium/source/campaign (example: a number for Sydney an one for Melbourne that needs to swap consistently for paid advertisement on the same page)
Show one number from a pool for one combination of medium/source/campaign (example: for paid advertisement, it will be shown a different number from a selected pool)
Any combination of the above examples.
In order to access this module, navigate to CustomerPortal. Click on the Cogwheelthen Call Tracking > Dynamic Numbers Insertion
You'll be presented with the Dynamic Number management interface.
By Clicking on New Campaign you can create a new Dynamic Number Tracking Campaign. You'll be also able to change your existing campaigns.
Check the table below for a reference of each column in the table.
Column
Information
Configuration
Default template name.
Campaigns
Name of the campaign added by you, also direct link to "manage" panel.
Domains
The URL of the landing page / pages.
Template
Type of Dynamic Number Insertion deployed on the website:
- Automated Number Replacement - this template search and swap sany phone number with a tracking number automatically, withoput changes to the website.
- Advanced HTML Replacement - allows for complex html to be raplaced instead of the number and allowing in-depth controlon how the replacements are performed.
Analytics Platform
The way how the user session is collected.
Manage Campaign
Direct link to "manage" panel. Tracking code modification have to be done for each code separately.
View Usage Instructions
Direct link to Online Call Tracking Configuration manual.
Configuring a Dynamic Numbers' Tracking Campaign
The Campaign configuration page provides you direct access to all available features. Here you can configure the way Dynamic Numbers interact with your website.
Name:Choose a campaign name according to what is the tracking source; e.g. if you are tracking your main website you could name it "Main Website".
Analytics Platform: You should choose the analytics platform you are using on your website. We support Google Analytics (Legacy), Universal Analytics and Google Analytics 4. We do our best to select automatically the Analytics Platform and we prioritise the one you selected.
Template: Choosing a template dictate the way you configure Dynamic Numbers on your website. Automated Number Replacement is the default and recommended option, while the Advanced HTML Replacement is available for complex configurations that require page manipulation in order to replace the numbers. Refer to the quick comparison below for the more relevant features.
Number Matching (Automated Number Replacement Only): Allows you to configure what numbers (specified as they appear on the website) the system needs to replace. This doesn't need to be strictly phone numbers. For example you can replace "1300 BUSINESS" in page with one of AVANSER's Tracking Numbers.
When you are done filling the form, click the ”
SAVE AND CONTINUE” button.
Automated Number Replacement Vs. Advanced HTML Replacement
Advanced HTML Replacement features are for advanced users that require to edit the html of the page in order to replace the numbers, these can be TEXT, Images or HTML elements. For more information about Advanced HTML Replacement please refer to the related KB Article.
Automated Number Replacement
Advanced HTML Replacement
No code changes to the website.
It requires the a span around the numbers
Can detect multiple numbers.
Requires extensive configuration to replace multiple numbers.
Simple script inclusion that works without any required library
In order to use the "Tag Manager" functionality the engine requires jQuery
All text numbers and links can be swapped automatically.
Each HTML element containing the number must be targeted and a html replacement must be provided.
Does not support image swapping.
Supports image swapping, although the client must provide the image link.
Automated Number Replacement Overview
The Automated Number Replacement template simplifies the configuration of a website. Without specifying any rule, the engine will scan the page looking for phone number patterns, replacing them with the tracking phone number according to Dynamic Numbers configuration.
You can target as many numbers as you want, for example if you have a call number and a fax number on the page and you don't want to replace the fax number.
If you have a single number on the page or you want to replace all numbers displayed,
You simply configure no Number Matching rules.
If you want to replace only certain phone numbers, you can list them in the way they are displayed in the page; for example if you have 1300 123 123 and (+61) 1300 121 23 in the page simply list them in the number matching rule,
The replacement is also done in the <a> links on the page. Mobile Click to Call directly from the web will use the correct number.
Everything is done automatically and you don't need to worry about swap insertion, css rules or html tags.
This method, unfortunately, does not support changing the content within images. However, it will replace the phone number in the links used by images.
Configure Tracking Sources and Mediums
Numbers used by the tracking configuration are configured in this next step.
You can choose to use a single number or multiple numbers depending on the tracking accuracy you need.
More phone numbers assigned to a configuration will result in more accurate data associated with it.
AVANSER provides additional metrics you can configure to segment and accurately track your campaigns by adding to the usual medium and source metric. This is done using the Numbers Configuration interface.
Number Configuration allows you to segment your tracking as desired.
The configuration interface offers the ability to configure tracking parameters that allow you to control what numbers are displayed to what audience. You can segment your tracking by medium and source of the visitor, as well as campaign, device and keywords.
For example, if you choose “paid” as a medium, the numbers in the page will be replaced only if the medium the visitor used to reach your website are paid ads. If you choose google as your source, numbers will be displayed only for paid ads coming from google.
Replace Numbers by Campaign
Campaign segmentation allows you to create individual landing pages on the same domains and be able to display a number associated with the campaign throughout the visitor journey on your website.
For example, if you are running an ad campaign and you want to track the paid ad generated by that campaign, you can set the campaign parameter to the name of the campaign (eg; "googleads new product" or "landing_page_ads").
We recommend that you use simple names and replace spaces with underscores. This decreases the chance of mistakes when copying and pasting these values.
E.g. "Sydney New Campaign" should be named "sydney_new_campaign". This value can be used later to match the correct numbers by the script without being truncated because of spaces. You can segment traffic via campaigns by setting the campaign parameter in the url or via javascript;
https://your.domain.tld/?utm_campaign=some_campaign_tag
Alternatively, you can set up the campaign on specific pages. This topic is covered later in this document.
Replace Numbers by Device
Device Segmentation allows you to display different numbers for Mobile, Tablet and Desktop audiences.
Replace Numbers by Keyword
Keyword Segmentation allows you to display numbers according to specific keywords. Note, it requires manually tagging the url using the keywords keyword set to utm_term or keywords query string parameters when setting up the ad redirection in google ads.
You will be able to see the configurations in the Configurations area once you have configured your tracking rules.
Tracking Using a Single Number
By clicking on the "Add Single Number" button you'll be presented with a tracking configuration screen that allows you to choose which conditions trigger the number replacement in your website.
Selecting a number from the “Available Numbers” will set the number for this configuration. It will also automatically fill the replacement number to the national phone number format.
You can now click save or you can customize the displayed number format by editing the “Replaced Number” field.
Tracking Using a Pool of Numbers
By clicking on the "Add Pool of Numbers" button, you'll be presented with a tracking configuration screen that allows you to choose which conditions trigger the number replacement in your website.
Each number will be displayed to a unique visitor, increasing the accuracy of the tracking at visitor level.
You will be prompted to use an existing pool or create a new one.
Changing an existing pool number list or replacement text will affect all tracking configurations using the same pool.
The pool will be created automatically - all you have to do is configure the same options available for single numbers.
Selecting a number from the “Available Numbers” dropdown field will add a new number to the pool. It will also automatically fill the replacement number with the national phone number format.
Tagging Your Ads
Once you configure a domain for the tracking configuration (see Step "Configure Website Domains"), each number displayed in the Configurations area will display an "attachment" link.
The links can be used to copy the manually tagged url to be used in ads URL or for referral tracking.
By clicking on the attachment link a popup with a link for each domain configured in the tracking configuration will be displayed.
Your manually tagged url can be copied by right clicking on the attachment icon next to the domain you want to advertise.
Remember this step during implementation (See Implementation section)
Configure Website Domains
Configuring domains associated with the tracking configuration simplifies the deployment of the code. You can add as many domains as you want.
If you choose to configure a domain for your tracking configuration, there is no need for a customized script - you just need to include the default AVANSER script.
We suggest using the "Add All Subdomains" button when adding domains. If your domain iswww.my-domain.comyou can type my-domain.dom and hit "Add All Subdomains".
You can use the same domain name on multiple tracking configurations. They are called Tracking Groups.
Tracking Groups
Tracking Groups are multiple Tracking Configurations that are running on a single website.
This type of configuration allows you to track multiple independent sources on the same website.
For example, if your website shows numbers of multiple branches, you can create a tracking configuration per branch. Each branch will have its individual tracking session. You simply configure what numbers have to be replaced for each branch in their respective configuration and link them by adding the same website to both configurations.
Tracking Groups are not suitable to track Campaigns. In order to track campaigns, you should use the campaign segmentation property in the Numbers Configurations.
Migrating from Advanced HTML Replacement to Automated Number Replacement
If your website uses Advanced HTML Replacement, you'll need to update your configuration to use the new version.
In order to do so, open the Tracking Configuration you want to update and change the Template field to "Automated Number Replacement". Configure the Number Matching rules according to your website as explained in the sections above.
You'll need to update the number replacement. Open each Number configuration in the Configure Tracking Sources and Mediums section, temporarily remove the number from the list and add the number back into the list. You can save once you have completed removing and adding the numbers back in the configuration. This process will update the html returns presented to the new script.
The Tag Manager tool will not be available in Automated Number Replacement as it is not required.
Alternatively, you will have to create a brand new configuration following the examples and guidelines above and migrate the numbers and their configurations one by one.
Configuration Checklist
Tracking Configuration
Template is set to Automated Number Replacement
Number Matching rules are set up to replace the correct number in the website.
Numbers Configurations
Main Tracking Sources and Medium are configured: Organic, Paid, Referral are set.
Campaigns are configured.
Paid, Referral are set
Campaign field is set to the correct campaign tag.
Websites
All domains the camping is supposed to run are configured in the list.
Installing Dynamic Numbers Using Google Tag Manager
Google tag manager is recommended to deploy AVANSER tracking.
Using the Automated Number Replacement configuration simplifies the process of implementing the code by greatly reducing the need for changes to the website.
The steps below assume that the Tracking Configuration is using Automated Number Replacement and ??as domains set. Deployment will be done using Google Tag Manager, but the same steps apply to other tag manager solutions.
In order to follow the steps below it is assumed that:
You are familiar with Google Tag Manager and Universal Analytics, Google Analytics 4 and your ad platform of choice.
Your website has already a Google Tag Manager tag installed.
Your website is already running Universal Analytics, Google Analytics 4. (This can be done using Google Tag Manager as well.)
Configuring the AVANSER Script
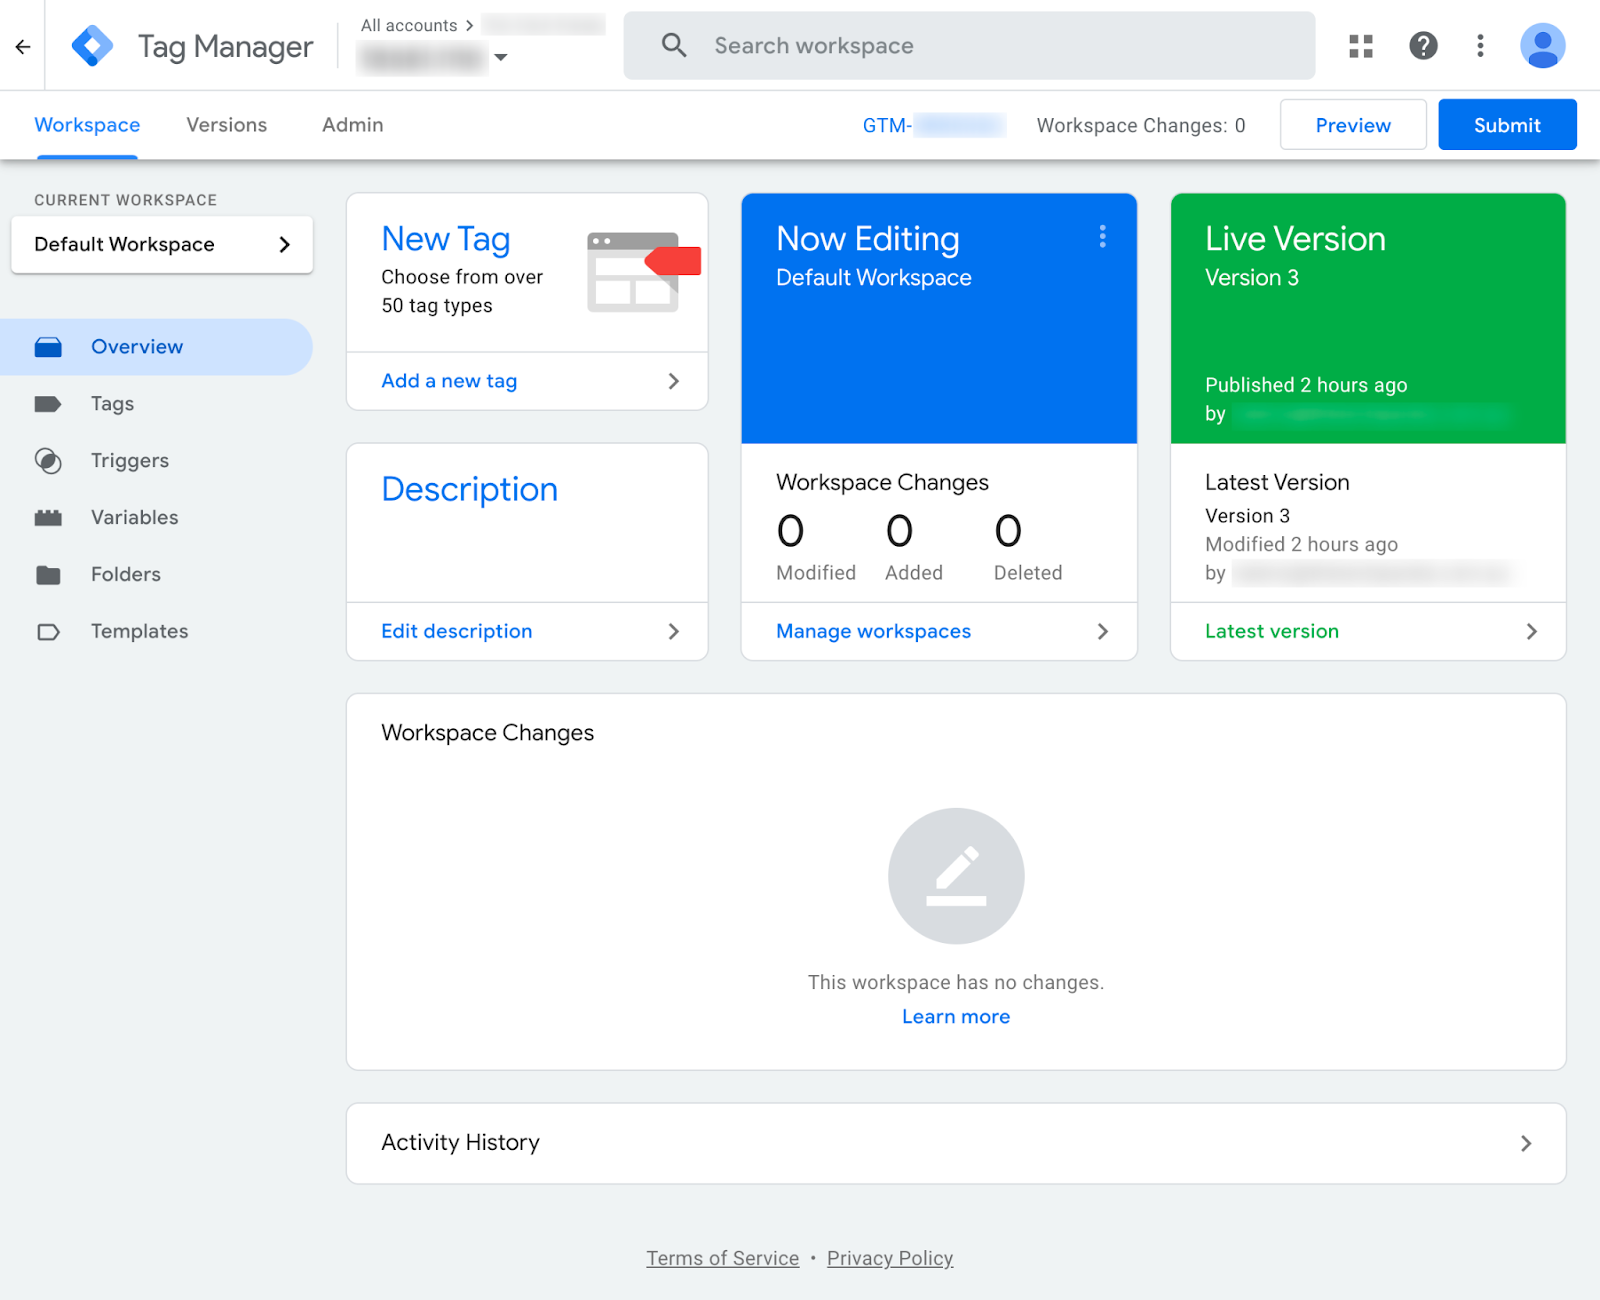
Access the Google Tag Manager script associated with the website.
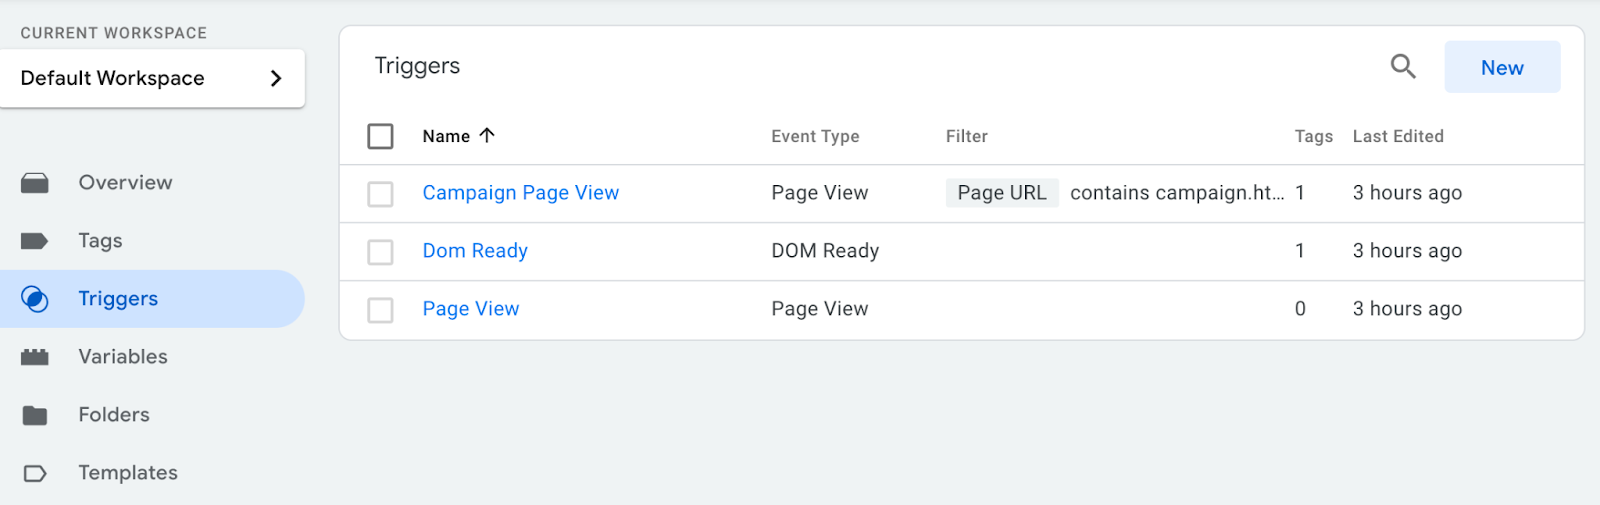
Configuring Triggers
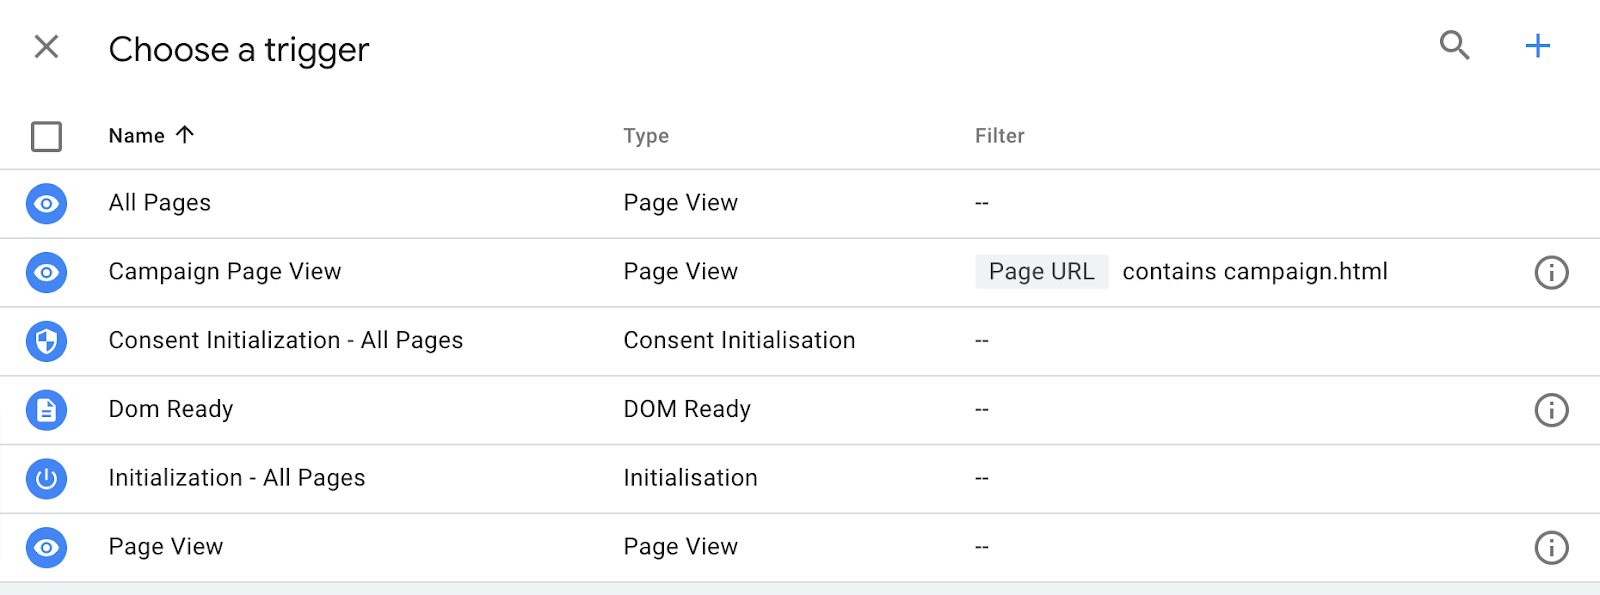
Navigate to Triggers and check if you have a Dom Ready trigger.
If you do not have an event type DOM Ready, click on the NEW button at the top of the list.
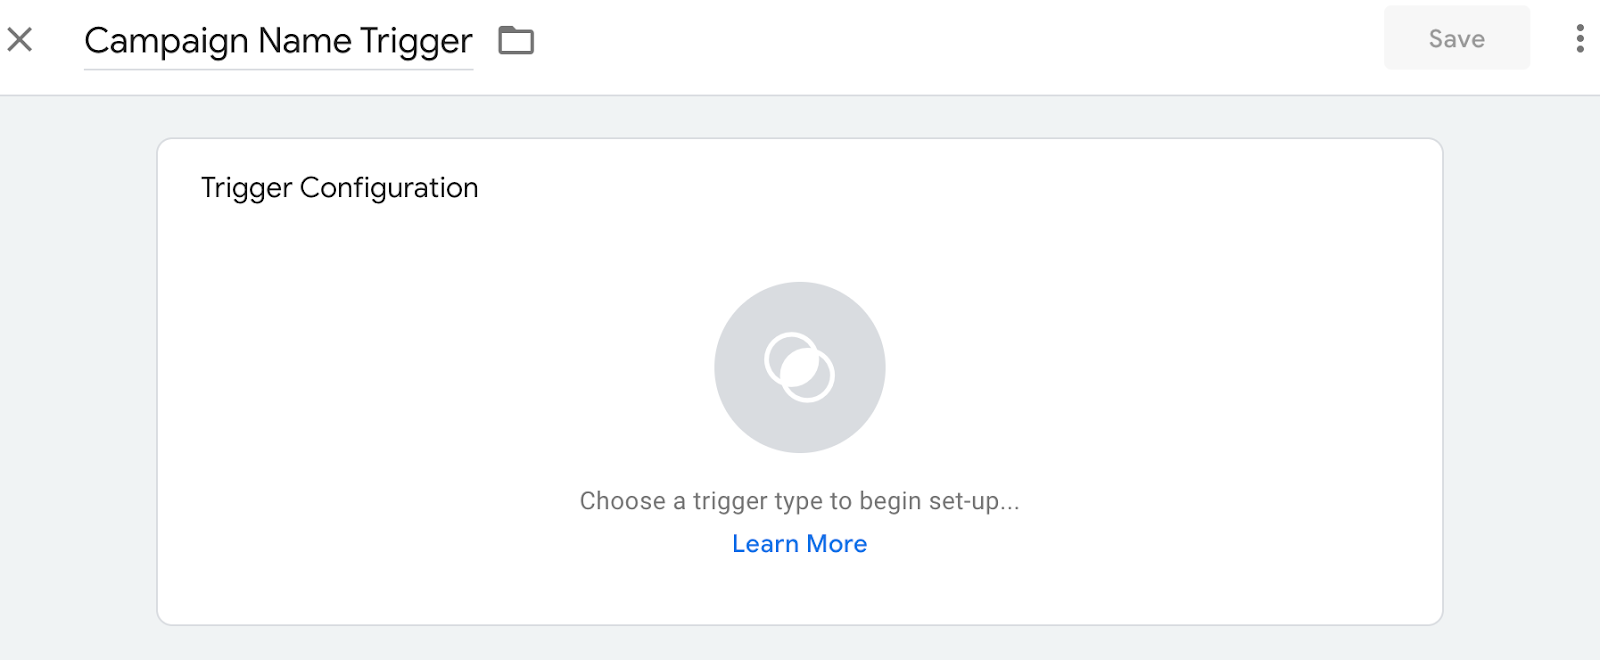
Creating a "Dom Ready" Trigger
The Dom Ready trigger is the trigger used to detect the page has loaded. This will be the moment AVANSER script will be actioned by Google Tag Manager.
Change the title from
"Untitled Trigger" to
"AVANSER Dom Ready" and click on the
"Trigger Configuration" box.
When prompted to choose a trigger type, select
Configuring the Tag
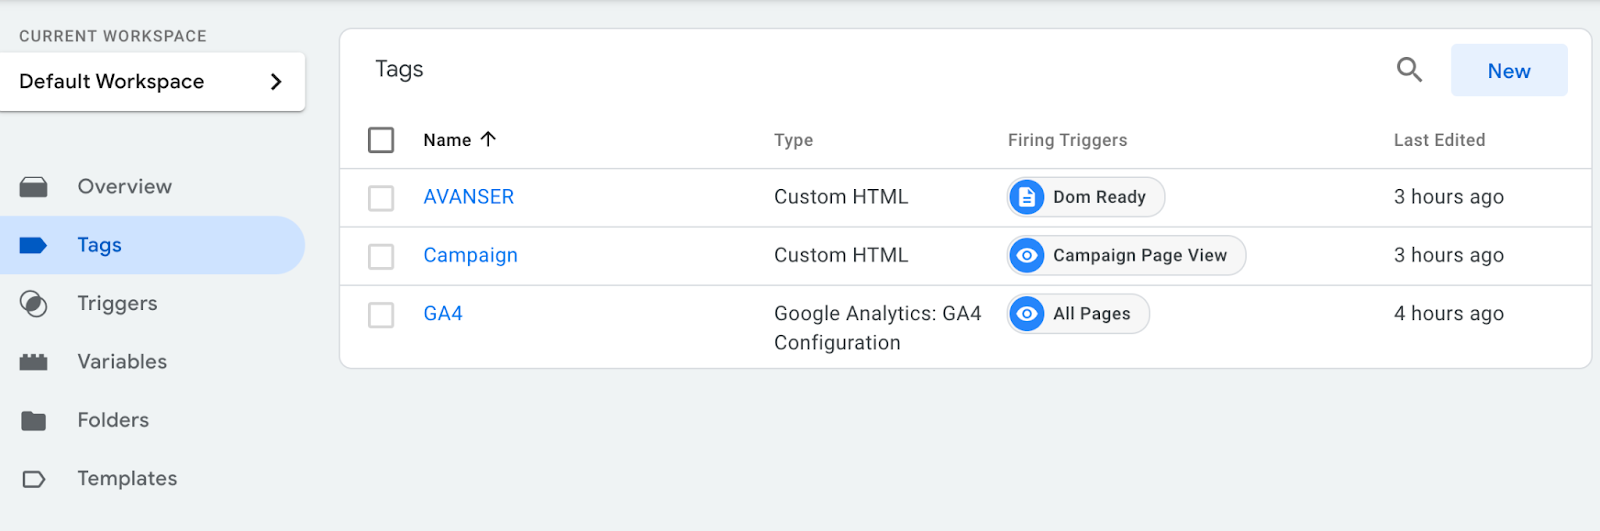
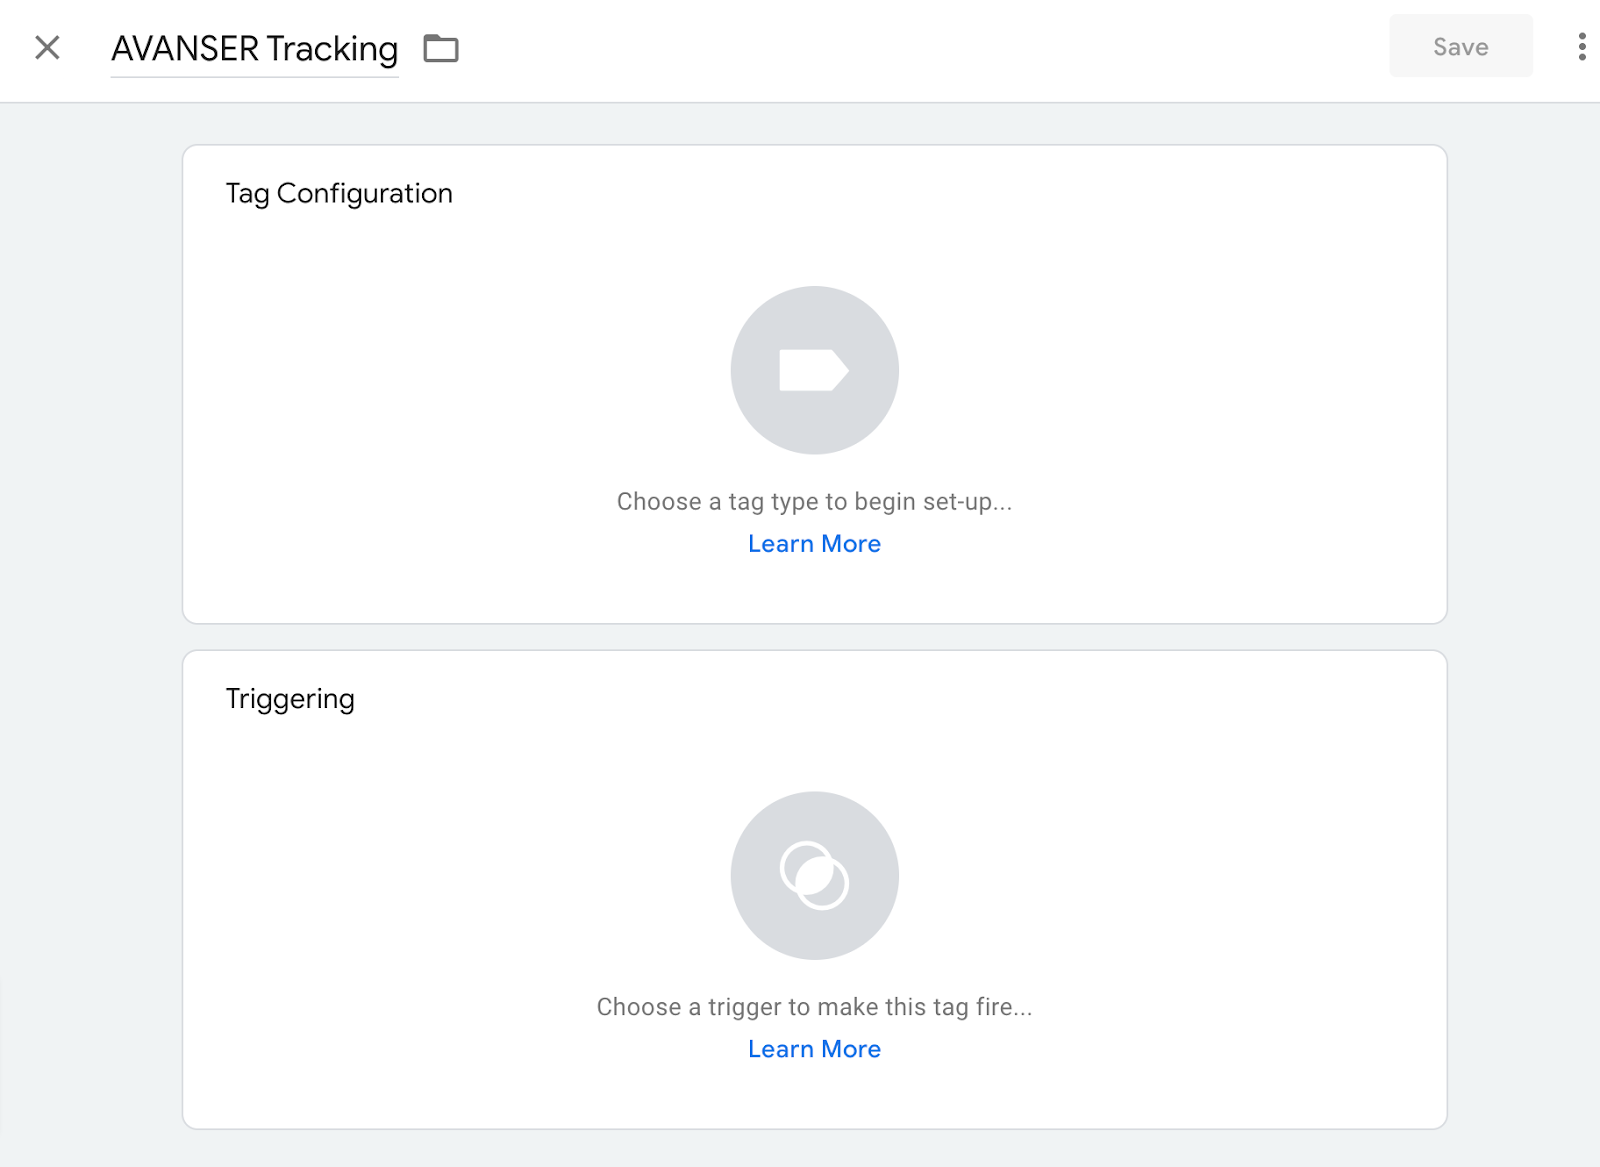
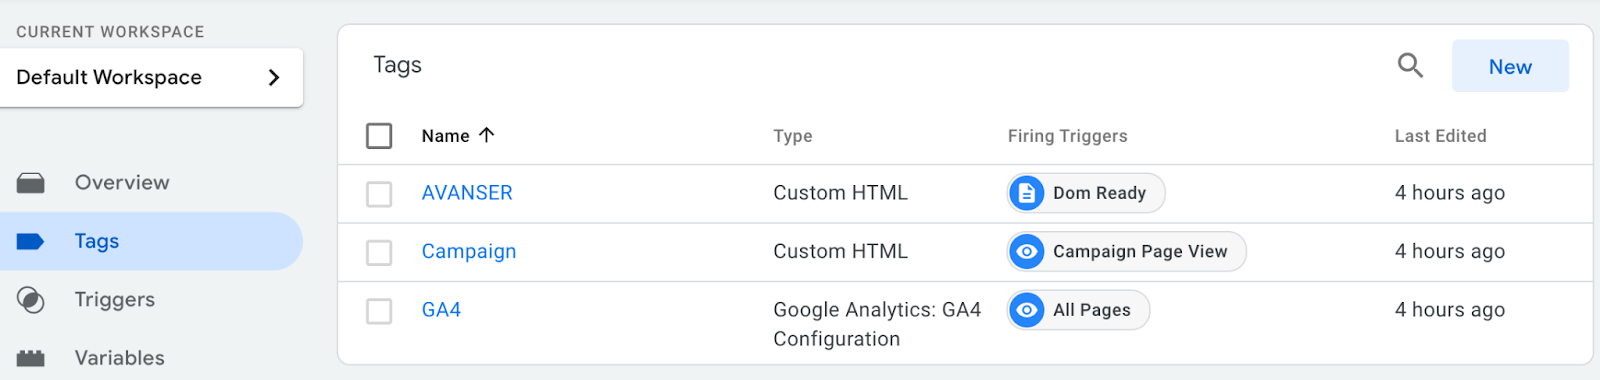
Navigate to Tags and click on the NEW button on top of the list. If you have an existing AVANSER tag you can edit that tag.
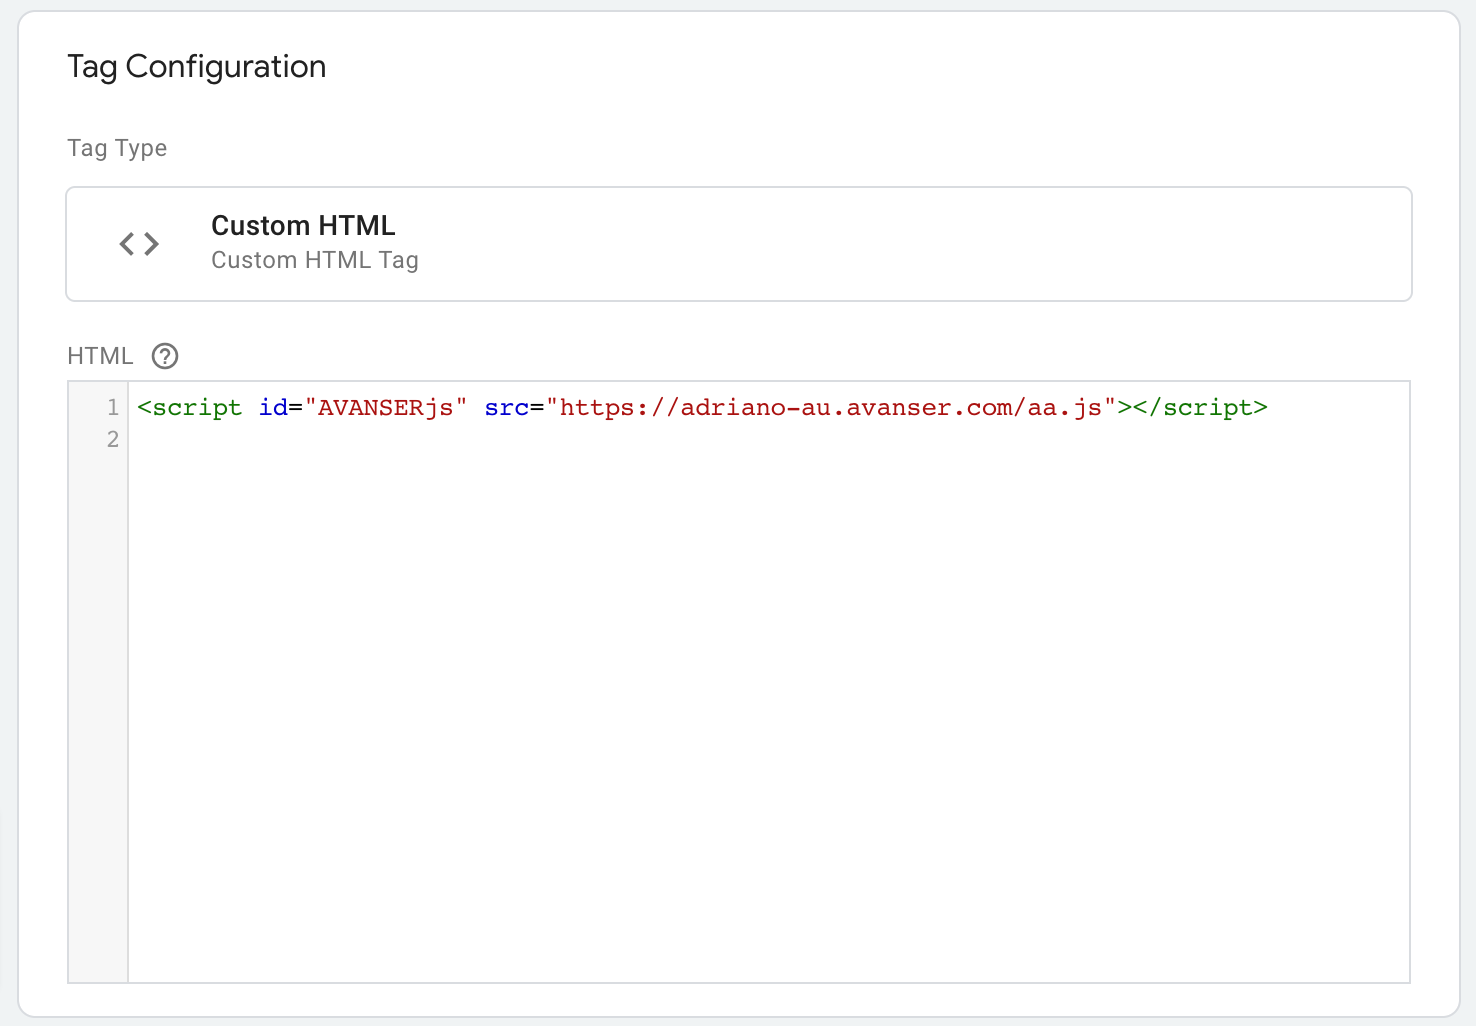
Change "Untitled Tag" to "AVANSER Tracking" and select the tag configuration by clicking on the "Tag Configuration" box.
When prompted to choose the type of tag, select
The Tag Configuration box will expand and present you with a text area for your javascript.
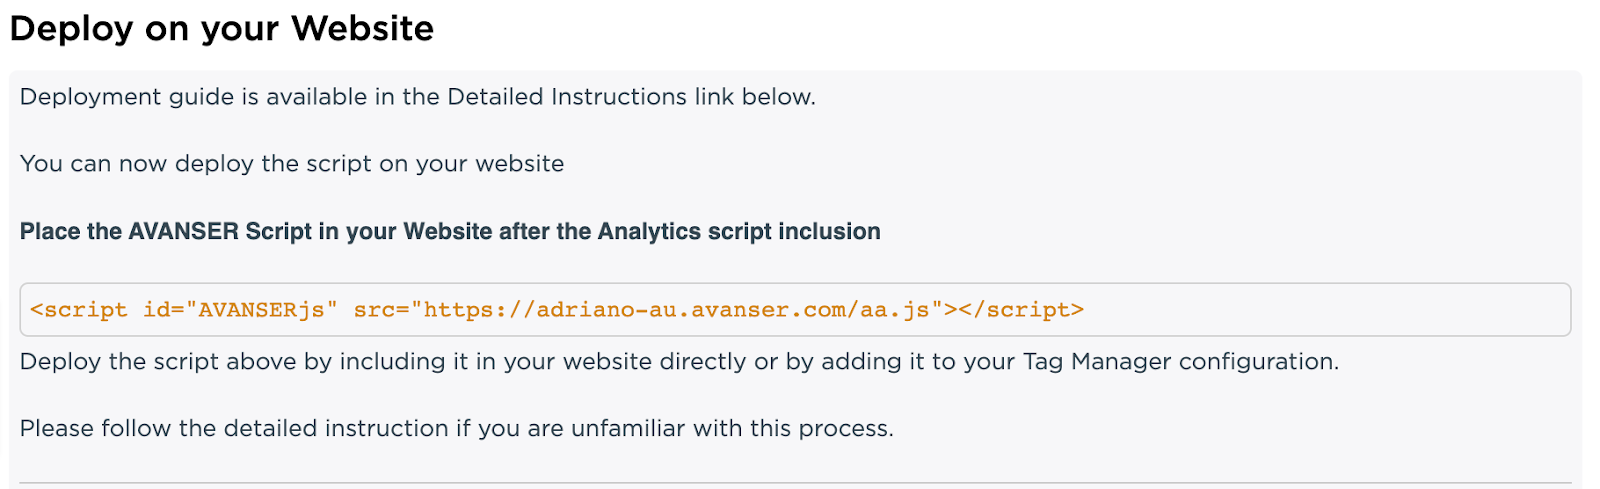
You can put the standard AVANSER script according to your region.
The link to the script is available in the Tracking Configuration page at the bottom.
Click “now” on the "Triggers" box to select the triggers for the AVANSER Tracking tag;
When prompted to choose a trigger, select AVANSER Dom Ready or your own Dom Ready Type event.
Remember to hit the “Save” button at the top of the page to apply your changes.
If you have followed all the steps accordingly, AVANSER Dynamic Numbers will be already installed in your website.
You can now proceed with testing the swapping of your numbers.
Controlling the tracking configurations based on the page a visitor lands using Google Tag Manager
At times you may want to change the tracking information detected by the script automatically as you want to present a number associated with a specific medium, source or campaign or a combination of the three.
Using the standard AVANSER script associated with a domain makes this change incredibly easy.
All that is required is to load on page view a small script containing the overridden configuration.
This is particularly handy if you are running multiple landing pages for different campaigns on the same website.
Follow the steps below:
Navigate to the Triggers tab in Google Tag Manager.
Create a new Trigger by clicking on the NEW button.
Change "Untitled Trigger" to something indicating the campaign you are running, eg: "product launch landing page", "service xyz landing page".
Click in the "Trigger Configuration" box and select to configure its properties.
Ensure that the trigger fires on "Some Page views" and that the first select is set to "Page Path".
Configure the page that should trigger the event.
For example if your website page is:
https://example.com.au/tracking/campaign.html, you can configure the second select box to "ends with" and place
tracking/campaign.html in the third value.
In general, you have to ensure that the trigger will be fired only if the page is matching the page you want to override the number selection.
The trigger will have to be a Page View, so that it runs before the Dom Ready Event. This way nothing has to change in the website but you are going to control the tracking configuration on a page by page basis.
Once you have configured the trigger you can navigate to the Tags tab in Google Tag Manager.
Hit the “NEW” button to configure the Tag for the newly created trigger.
You will be prompted to create a new Tag.
You'll have to change the title to something meaningful eg. same name as the campaign.
Select as the tag type.
You will be prompted to input your script as shown below.
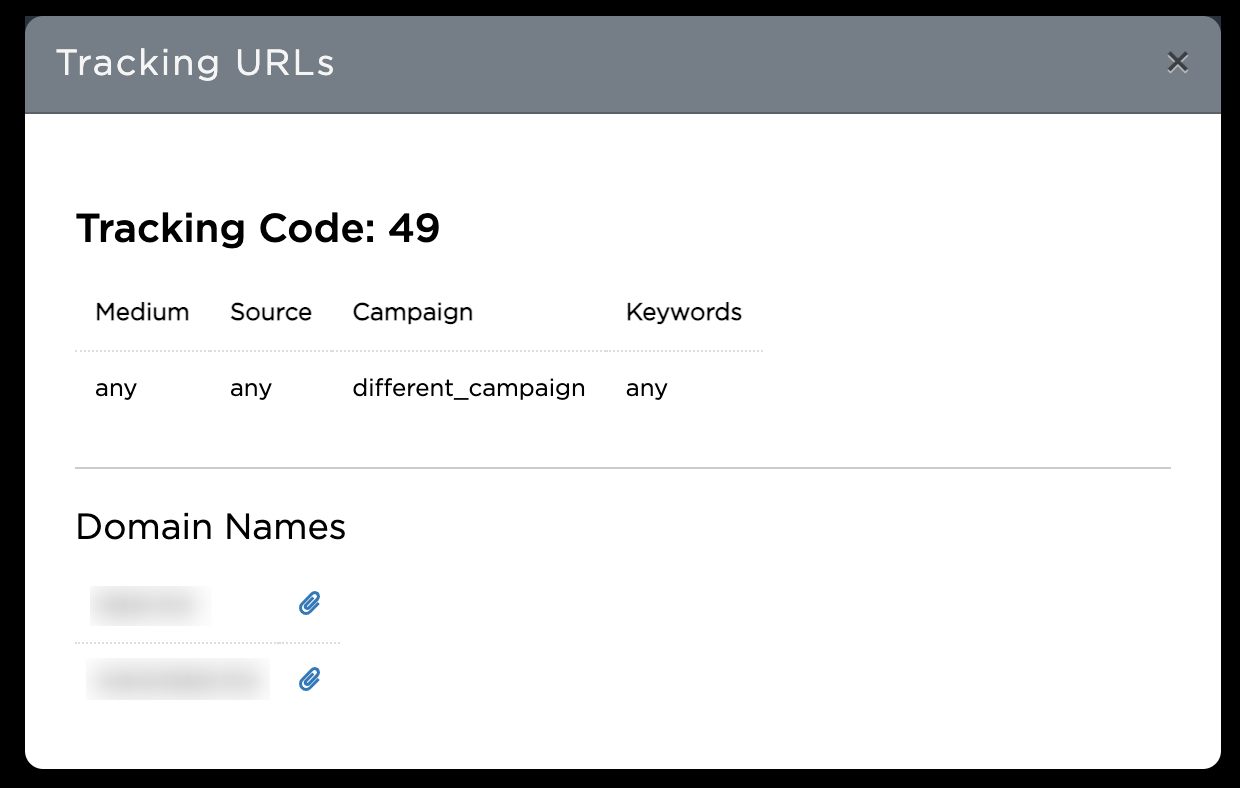
In order to override the default tracking mechanism implemented by Dynamic Numbers, you need to set the properties you want to override in the AvanserOptions global variable.
It is suggested that you do so by setting the property in the Window Object.
<script type="text/javascript">
window['AvanserOptions'] = {
campaign: 'different_campaign'
};
</script>
The example above shows how to override the campaign property. You can also override medium, source, trackingCode and clientId.
Customizing Dynamic Numbers Javascript Engine
Overriding campaign - The value must match the value configured in the Dynamic Numbers configuration. If your campaign is configured as "new_landing_page" set the campaign property to the same value.
<script type="text/javascript">
// example override campaign name
window['AvanserOptions'] = {
campaign: 'new_landing_page',
}
</script>
Overriding campaign, medium and source - campaign, medium and source must be configured in the Medium and Source configuration section of Dynamic Numbers. Their values must match the values configured. The example below assumes that a campaign named campaign name, a medium named referral and a source named linkedin are configured with a number or a pool of numbers.
<script type="text/javascript">
// example override campaign name, medium and source
window['AvanserOptions'] = {
campaign: 'campaign name',
medium: 'referral',
source: 'linkedin'
}
</script>
Overriding the trackingCode - With the example below, you can switch tracking codes to track subsections of your website. For example, if you have independent businesses displayed in the same domain, you can use multiple tracking codes to track each individual business performance. Using the script below will allow you to choose what tracking code to apply to a specific page.
<script type="text/javascript">
// example override tracking code
window['AvanserOptions'] = {
trackingCode: 2,
}
</script>
Configuring your Ad Platform for campaigns, mediums and sources
When you are configuring your Ad Platform and you are running multiple campaigns or you are using custom mediums and sources, you'll have to manually tag the url in your ad campaigns.
This means that the "Redirect To" or the Ad's "Landing URL" must contain the url parameters to select the right campaign, medium and source.
While medium and source are automatically detected (and they generally don't need overriding), overriding the campaign parameters at Ad level will greatly simplify your Google Tag Manager and website configuration.
When you are running an Ad that has custom properties like custom medium, source or campaigns, you must use the url made available in the website as described in the "Tagging your Ads" section above.
This will guarantee that the Dynamic Numbers engine will correctly display the number associated with the campaign you configured in the interface.
Please refer to the Ad Platform of your choice on how to do that. You have to set the url the ad will use to redirect users to your website.
Configuring your numbers for reporting
There are a wide range of integrations available for you to manage directly. You can configure each number for a number of integrations including Universal Analytics, Google Analytics 4, Microsoft Ads and more.
Access the Dynamic Numbers configuration for the website you want to test.
In order to test your website using this method, it is assumed that you are using the Automated Number Replacement method and you have configured at least a domain for the Tracking Configuration.
Navigate to the
Configure Tracking Sources and Mediums and find the configuration you want to test then copy the url by clicking on the attachment icon at the end of the configuration summary.
A popup will open showing you multiple urls to copy or open.
Copy one of the urls and open an incognito window.
Paste the url in the address bar, then press enter.
Verify that the number changes according to the configuration.
Remember to close old Incognito or Private windows before testing different source/mediums and campaigns.
All numbers on your website that match the Number Matching rules (if any) will be replaced with the tracking number associated with the configuration.
You can now perform a call to the number and verify the session information is passed to your third party platform of choice.
Things To Remember
All details are explained and available to you within configuration while you set up your dynamic numbers. Please contact your Account Manager if you require more details.
ADVANCEDandBASICTroubleshooting guides for Dynamic Number Insertion can be found in Knowledge Base.
AVANSER Dynamic Numbers is a service designed to replace the Phone Numbers in your Website with an AVANSER Tracking Number, this process does not change the source code of your Website, but, instead, process your Website when is displayed to ...
This article provides the most common way to test the code provided by AVANSER. Tracking Configuration when Domains are configured If you configured a domain it is fairly simple to test the script: Edit the configuration you want to test. Scroll to ...
This article is part two of a two-part guide in troubleshooting AVANSER's Dynamic Number Insertion code on your website. This guide will help ensure that the code is installed correctly, and is working as expected. If you have not already attempted ...
This article is part one of a two-part guide in troubleshooting AVANSER's Dynamic Number Insertion code on your website. This guide will help ensure that the code is installed correctly, and is working as expected. This article covers the basics of ...
Regarding keyword attribution in the AVANSER Portal, the Ad URLs have to be manually tagged in order to retrieve this data. Please see below for more information: In order for the session details of the caller to be picked up by the AVANSER system, ...
 Access to this tool has been limited to authorized users only. If you required certain users to have access to this module, please contact your Account Manager.


to configure its properties.

as the tag type.
